Tuesday, February 26, 2013

American Craft Council Show in Baltimore, the good stuff

It all started with that I went to the Philadelphia Craft Show about two years ago and met the quilting artist Erin Wilson, whose work I love.  PP bought a little piece of her work for me (thanks) and from there it went down hill (which is a good thing!).  We saw her work again in May in Morven in Princeton, with several new pieces, including a quilt in green, browns, and reds that I am now the happy owner of!  I look at it every day. Here is a piece of it as a taste for you all.
A new amazing art quilt by Erin Wilson

And now Erin was exhibiting her new work again in Baltimore, at the American Craft Council Show.  I really have been pulled into the craft world through that first visit in Philadelphia. (Well, we also went to Baltimore to feed AREA who is in art school there :)

So, the American Craft Council Show is a giant thing, with maybe a thousand selected exhibitors. Everybody that is someone in the craft's world in the US is apparently there.   Everything is small-scale, handmade, and based on craft techniques.  Not everything has to be utilitarian, but I think the idea is that it has to be built on the idea of crafts in the past.  I am not sure, and I think the Craft Council isn't really sure either, because some things that I expected to see at this show are totally lacking.  More on that later some other time.  Now on to the good stuff.

new amazing quilts by Erin Wilsonnew amazing quilts by Erin Wilson
Two new amazing quilts by Erin Wilson.  The white one reminds me of winter and fog...  What do you see?

Great art in felt! Flower and rock brooches
I love the felt art by Danielle Gori-Montanelli. She cuts and glues felt together as legos, licorice pieces, flowers, rocks, and all kinds of other fantastic things.  Chocolate too!

glass art by Gayla Lee
Gayla Lee's glass pieces were fascinating. 

painted bowls (geranium, grapes, apples, etc.) by Sherwood Forest Design
And this photo is for EH, look a bowl with painted geraniums! The bowls are made by Sherwood Forest Design. I think this was the only painted wooden bowls I saw there.  There was plenty of turned bowls in plain wood, but not much in this 'old-country' style.

Michel Michaud metal designs from botanical objects
This I like!  Michael Michaud takes nature's designs, mostly botanical, and cast jewelry pieces out of them.  I own several and love them!  Actually, right now when I write this I am wearing his lilac flower ear rings.

mediumberriesdkblue659longpodsamber584
And here is my new find!  Andrea Haffner's designs, jewelry with natural twists and turns.  She collects natural objects, mostly plants, dries them them embeddes them in resin inside small metal boxes.  It is all handmade, unique, fantastic and gorgeous.I bought one of her small pendants, a darkblue box with a tiny mussel and three pearls inside, like a piece of a moonlit beach. [images from Andrea Haffner, used with permission]

There were many more interesting things to see, but I was running out of battery in my camera.  If you want to explore some more things we liked, check out: 
 Bryan Hopkins, Functional and Dysfunctional Porcelain
Deborah and Richard Bloom, obsidian windchimes
Holly Tornheim, wood carvings
Liz Alpert Fay, hooked rugs and much more
Wendy Stevens, metal handbags
Laura Baring-Gould Studios, bronze sculptures
JAK designs and their tulip scarves

The not so great stuff gets a separate blog post at some other time, maybe, maybe not.  We will see.


Monday, February 25, 2013

Stamp of the Day: Zip codes! (postnummer)


This stamp oozes 1970s in its bubbly, rainbow-colored design, don't you think?  And it is celebrating the zipcode (or reminding people to add it to their letters, or both).  I love its happiness...

Thursday, February 21, 2013

A trip to nostalgia land

The Swedish Museum of Art (Nationalmuseum) in Stockholm is now closed for a several year long renovation, but we visited it one of the last weekends when it was open and I was in Stockholm.  One of the most fun exhibits was the one on functional and industrial design.  It was filled with so many items I know so well from my upbringing in Sweden, and some of them have even made it over to the US.  Here is a selection, with annotations:

Chair, 'Lamino', design by Yngve Ekström, Swedese Möbler 1955
When I grew up we had a Lamino chair at home, covered with gray woolskin, and it was wonderful.  I had no idea then that it was a classic bent-wood design.  The chair and its footstool is still in my mom's apartment and I sat in it just a month ago.

The Swedish dishbrush!
Swedish dishbrushes!  Once I went to a summer camp with a girl whose father had the patent on the straight line on the front that you use to scrape off hard pieces from your plates if you turn the brush around.  I bet he got a lot of money from all the dishbrushes that have been made in the last many decades.

I remember these lamps! They were incredibly plastic.
This kind of very plastic and cheap-looking lamp was common in youth hostels and rented cabins.  I think we had one too, orange maybe, and I have a vague memory that it nearly caught on fire once, but I could be wrong.  They weren't very good lamps, but popular.

Queue system with papernumbers (kölappsystem)
The very practical Swedish queue-system.  Used at every postoffice, bank, police station, you name it. I actually like this a lot better than standing in lines.

Swedish LM Ericsson phone in bakelit
A classic telephone, of the type that was provided by the phone company.  Back then you couldn't buy your phone, it was provided and owned by the phone company.  I think this one was made by Ericsson for the state-owned telephone company (which is no more, it is now privatized).  These were still in use in the 2000s, but I think they are gone now, since the outlets are different now.  Oh all the times I sat and dialed the numbers on the turning dial.... You couldn't hurry it, it took its time.

china, 'Blå eld' by Hertha Bengtzon,1951,  Rörstrand & Printed fabric, 'Pythagoras' by Sven Markelius, 1952, NK's textilkammare
This line of china is one of my favorites, and we had some at home when I grew up.  Blå eld means Blue Fire, and my sister collects this brand.

Table, 'Lack', IKEA, design by Jan Hellzen, 1979
This is probably the most common object in the whole exhibit.  IKEA's table LACK, which is still being sold.  We have several here at home in the US.  IKEA furnished so many homes in Sweden, it saved our budgets and book collections (thanks for Billy!).  I didn't realize that the LACK design was over 40 years old by now.

Swedish milk cartoons, Tetrapak, Arla
I don't know the year of this collection of dairy containers, maybe late 1980s?  Featured here are: regular milk (3% fat), 'middle milk' (1.5% fat), light milk (0.5% fat - too watery for me), mini milk (0% fat or nearly so),  'vispgrädde' heavy cream (40% fat), and 'gräddfil' (sour creme, but runnier, 12% fat).  The containers are Tetrapak, paper with plastic on the inside.  Oh, the memories....  :)

Wednesday, February 20, 2013

Sunrise over Norway in winter


Sunrise over Norway in winter, originally uploaded by Vilseskogen.
Norway looked very cold and very wintry when I flew home to USA in January. The sun is just rising and hitting the highest peaks of the mountains of Hardangervidda and the fjords stretching their fingers into the mountains.

Sunday, February 17, 2013

The deer and the train


Worlds Apart, originally uploaded by ericwill.
Another fantastic train photo by our friend EW. Click on the photo for more information. This photo just won a big award, congratulations Eric!

As per request: Homemade pizza recipe

gorgeous pizza (and it tasted good too)

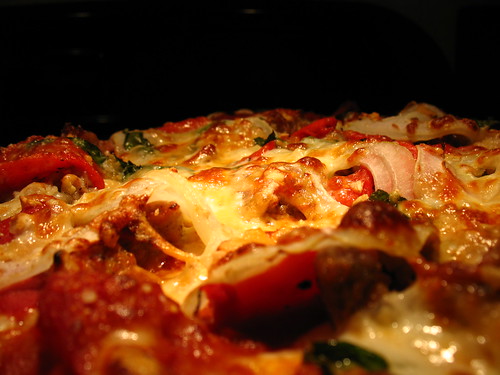
We have a Friday night tradition since the last couple of years - homemade thin-crust pizza.  After maybe 100 times of making pizza dough, tomato sauce and toppings, I think we have it down to near perfection now.  So, dear readers, as per request from several of you, here are the instructions.

Our dough was initially based on this recipe by Barbara Kingsolver, but we have modified it slightly.  Look for the heading for the part of the recipe you need.

TOOLS
As for tools, we use a KitchenAid mixer to mix the dough (optional), a rolling pin (just regular wood), and a ceramic pizza stone (you can use a regular cookie sheet, but a stone makes a big difference if you are going to make pizza often).
Our stone is as large as possible and round, and so light that you can lift it in and out of the oven easily.  I wouldn't recommend those superthick real stones. I can see a lot of crushed toes and achy backs from using those in a regular kitchen. Our stone is made of ceramics, very durable, started out as white but is now black (which is normal), and less than 1/2 inch (1 cm thick).  It is very easy to lift the stone out of the oven with the pizza on it, so no need to fiddle with wooden paddles or peels and other things you don't really need. Just get a thin stone and use your regular tools to lift the pizza over to a serving plate or serve it on the stone. And of course you can bake bread on the stone of you like too.
A pizza slicer is good, but think about what is below the pizza.  Soft aluminum might get scratched, and I don't really know if you can use it directly on the stone (we use heavy-duty scissors to cut our pizza mostly).

The recipe below makes 4 wonderful 16-inch pizzas (30 cm).

PIZZA DOUGH (partly whole-wheat, healthier style)

Time (active): 10 min.   Time (waiting): 2-10 hours.

Ingredients:

  • 1.5 cups of hot water (not boiling, about 42 degrees C, so varm but not superhot - I just use it out of the hot water faucet)
  • 1 package of dry yeast
  • 1 tablespoon olive oil
  • 1 tablespoon dried basil or other Italian herbs
  • 1 teaspoon salt
  • 1 tsp ground flaxseed (totally optional, just adds fiber)
  • 1.5 cups whole wheat flour
  • 2+ cups white flour (organic bread flour is good, but any regular all-purpose flour is OK)
Environment:  Yeast is a living organism and it lives and works best when the temperature is not too hot or too cold (about 68-80 degrees F, 20-25 degrees C).  During the winter, since we have a kitchen that is colder than 68 degrees F, I help the yeast along by warming the dough bowl first in hot water, and then by putting in the finished dough into a slightly preheated oven.  I turn on the oven at 100 degrees F, then turn it off and put in the dough in its bowl.  You never want to put the dough in the oven if the heat is on, then you cook it, you just give it a little extra warmth and less cold drafts.

Time: Most often I just make the dough in the morning, leave it out on the counter the whole day (8-10 hours), and when I come home for dinner the dough has risen and is ready.  You can of course make the dough 2-3 hours before you want to make the pizza, that is fine too, but then you might have to put the dough in a slightly warmer place than we do.

Using a standing mixer or not: This is totally up to you.  If you don't use a mixer, just mix by hand and knead the dough very thoroughly.  No clumps here.

Making the dough:
  1. Put the hot water in the bowl. Add the dry yeast. Let sit a minute or two.
  2. Add olive oil, salt, and dried herbs. (And flaxseed if you use it). Mix thoroughly.
  3. Add 1.5 cups of whole-wheat flour.  Mix thoroughly.
  4. Add white flour 0.5 cup at the time and mix in-between.  How much you need to add depends on how dense your flour is.  So go slowly and add enough so that the dough becomes soft and slightly sticky, not dense and not sticky at all (=too much).  You should be able to lift up the dough in one ball without it falling apart, and the dough should not stick to the wall, but it should still be slightly sticky.  Most often I add about 2 cups of white flour, sometimes slightly more, sometimes slightly less.  
  5. Let the dough sit in peace in the bowl under some plastic wrap and or kitchen towel for a few hours (up to 10 hours is OK).  Don't put it in the fridge.  The dough will double in size, so make sure your bowl is big enough.  Some people spray or coat the dough with olive oil, I put plastic wrap over the bowl instead to avoid it drying out during the day.
Tomato heaven: spaghetti sauce (meatless)


TOMATO SAUCE (homemade from canned tomatoes)

Time: 1 hour

We like chopped or strained, fire-roasted, San Marzano, plum or any other kind of Italian tomatoes for our sauce. Pomi is a good brand.  Watch out for canned tomatoes with a lot of salt or other things added to them - you just want plain tomatoes (with none or a little salt). Fresh tomatoes in the summer are wonderful, but need to cook down a bit, since they are quite watery, so add cooking time then.  Don't even try making this from flavor-less tomatoes from the store in the winter, then just use canned tomatoes.  Your own sauce will be better than store-bought pizza sauce, but if you don't have time, buy a good brand of good sauce without funny things in it. 

Ingredients:
  • 1 large can of tomatoes (28 oz or so, or use two small cans)
  • 3-6 cloves of garlic
  • 1 tablespoon olive oil
  • fresh basil (chopped, as much as you like)
  • black pepper
  • salt (maybe)

How to make the sauce:
  1. Chop up the garlic into tiny pieces.
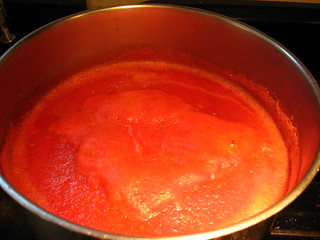
  2. Add the olive oil to a pot, heat it up a bit, and then add the garlic.  Stir and let the garlic become yellow (not brown!), and then add the tomatoes.  
  3. Let it all simmer on low temperature for a long time (the longer the better), but don't let the sauce become so thick it burns at the bottom, then just turn it off.  You start out with a thinner sauce and the simmering will make it thicker.  
  4. After simmering for a while, add cut up fresh basil leaves and black pepper, to taste.
  5. When the sauce is done, check if you need to add some salt. It all depends on how much salt was in the canned tomatoes.
Hints:  If you use chopped tomatoes, then your sauce will be chunky.  If you don't like that, run an immersion blender or use some other tool to smooth the tomatoes first (blender, etc.).  If your sauce is too runny, just let it cook longer. 


cheese

TOPPINGS

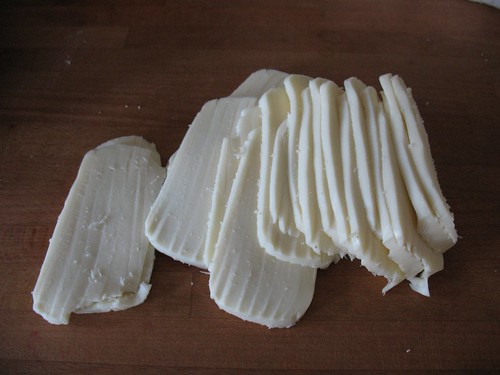
All our pizzas have some kind of cheese on them, and this layer is added last, on top.  Mostly it is grated mozzarella, sometimes parmesan, and sometimes ricotta or goat cheese.  We never use other kind of 'regular' cheeses, like cheddar, jarlsberg, etc.  They just don't act the same good way on top of a pizza and are only emergency-cheeses.
For all ingredients (except the sauce), try to make them as dry as possible.  Remove wetness by draining them or blog away fat with paper towels.
  • Italian sausage, hot or mild.  Cook this in a frying pan before adding to the pizza (this also gets rid of a lot of fat). (Swedes: this is NOT hot dogs.  This is ground up meat sold as fresh sausage, uncooked.  If you want to imitate this in Sweden, buy ground meat, add lots of spices and herbs, and then fry it up so the meat is  all in little chunks).
  • Pepperoni sausage or chorizo (cut up, not cooked)
  • Thin-sliced onion, raw, or cooked so it caramelizes
  • Thin-sliced mushrooms, fresh (we NEVER use canned)
  • Fresh basil
  • Fresh green or red peppers, thinly sliced
  • Roasted red peppers, canned, drained and dried on paper towels
  • Olives, pitted and cut in half, drained. (Black olives are best)
  • Artichoke hearts, canned, cut in half and drained
  • Shrimp, thawed and shelled, dry on paper towels (you cook these on top of the pizza, so you add them raw to the pizza)
  • Anchovy, drained on paper towels
  • Very thinly sliced eggplant
  • Arugula leaves, fresh (to add at the end)
  • Spinach, cooked, or fresh spinach (which can be watery)
  • Tomatoes, fresh from the garden in summer, great, but watery :)
  • Asparagus, fresh or slightly cooked
Let your fantasy go wild, there are many more options here. 

Here are some of our favorite combinations (all have tomato sauce):
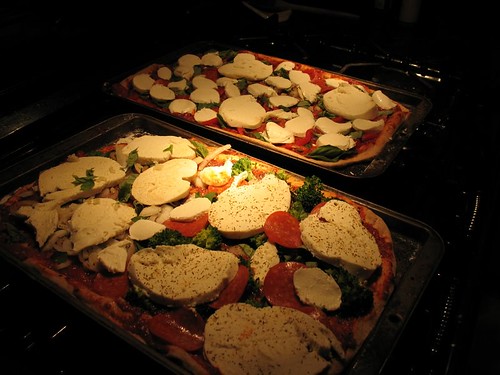
  • Margarita:  tomato sauce, basil, and mozzarella.
  • Prosciutto special:  Bake a pizza with tomato sauce, basil and mozzarella. When 2 min are left on the baking time, take out the pizza and add large thin slices of prosciutto over it, and a little parmesan.  Then back into the oven for a minute, then take out and add fresh small arugula over it. 
  • Mushroom, sausage and onion:  This is just what it is called.  Yum!
  • Anchovy and onion heaven:  Add lots of sliced raw onion and then anchovy and parmesan plus mozzarella. 
  • SAR combination:  Shrimp, artichoke and roasted red pepper. 
  • Burger pizza:  Instead of sausage, cook burger meat and add to pizza with some onion.  Then the pizza is cooked, add fresh, chopped lettuce on top.  Eat. Good. Food.
homemade pizza

MAKING THE PIZZA AND COOKING IT
(Start this at least an hour before you want to eat.)
  1. Put the pizza stone in the oven.  It needs to be put into a cold oven, not hot (this is important!), and needs to heat up for at least 30 min.  (Skip this step if you don't use a stone)
  2. Turn the oven to highest temperature (450 F for us).  [This is why you should NOT use baking paper for pizza.  It might ignite at these high temperatures). We have a convection oven, if you don't, just use the regular setting for overall heat.
  3. On a large clean surface, add some white flour and put the dough on top of it.  If the dough is very loose, you can knead in some more flour now, but usually you don't have too.  It depends if it sticks or not.  Cut the raised dough ball into 4 pieces, and put three pieces aside.  Take one of the balls and roll it out into a round area with a rolling pin, use flour underneath and flip it over now and then so it doesn't stick.  When the size is right, stop. The dough is thin, this makes thin-crust pizza (so, much less carbs than thick crust pizza.)
  4.  When the oven is hot and the stone has warmed up, take the stone out of the oven. It will be very hot.  Put the rolled out dough on the stone, let it sit for 2-3 min to cook on the lower side, then flip it over with two spatulas so the other side can cook a little.  Add tomato sauce and all the toppings.
  5. (Note for people that don't use baking stones.  Add your dough to a floured cookie sheet, and cook the dough by itself in the oven for 5 min or so, than take the dough out and add the toppings, and then back in the oven.)
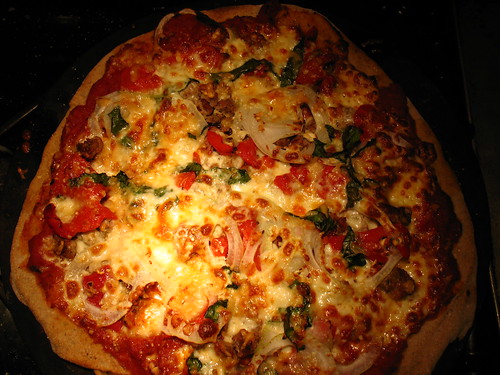
  6. Put the pizza in the oven, cook it for 8-12 min (this depends on your toppings and your oven).  You want the edge to be a little brown and the cheese to have started to brown on top.  If your pizza is done but still very wet and saucy, that is probably because you used very wet ingredients (shrimp, fresh mozzarella, fresh peppers, etc.).  Don't worry about it, just eat it with fork and knife. 
  7. Take the pizza out, slice and eat. Enjoy!
  8. If you want to make more pizzas (you have 3 doughballs left!), just remove the pizza you made from the stone, put the stone back in the oven to reheat for 5 min, and make one more.  We eat and make 3-4 pizzas every Friday night and make them as we go along, since they only need to cook for such a short time.  
What about leftover pizza slices?   Save for next day lunch or freeze. We put baking paper between our slices so they don't stick together.

You can freeze the dough, just put it in a plastic bag and seal.  To use frozen dough, remove from freezer, thaw at room temperature or slightly above in a bowl with some flour.  Remember that the frozen dough has already risen, so it will not get bigger than the piece you have.  So roll it out, and make the pizza bottoms as usual.  I find that fresh dough is better, because it is slightly fluffier when you bake it, but frozen is OK too.

The dough is also perfect for flatbreads, pierogies, and other small pockets of food. 

RESULT

pizza landscape
 

Sunday, February 10, 2013

Book reviews: Patagonian travels, one great, one not

 A few months ago I picked up an old Swedish book given to me by a friend, who I have long forgotten, but it was a book I had wanted to read for a long time: Bruce Chatwin's In Patagonia.  I think my copy might be the first edition from 1981 in Swedish.  I dug in and started to read, with high expectations, because this was a 'real travel writer'!.  As you might know, I mostly read right before I fall asleep, maybe half an hour a day, at the most.
  Bruce Chatwin leaves work and travels to Patagonia, seemingly unplanned, a place he has always wanted to visit.  His travel diary is not a diary in the regular sense, more broken pieces and fragments of text from his experiences in Patagonia with inserts of history, commentary, and cultural reflections.

And here is the main problem.  Bruce stands outside the whole travel experience.  He reports like a objective journalist, not a person present in the moment.  And he even fails at being objective, because many times you can clearly feel the aversion he has to the people he meets.  It is not a boring book, and the text is excellently written, beautiful in fact, but it is not a good book.  You don't get a feel for the place, and it is too fragmented.

The detachedness of Bruce Chatwin is disturbing.  I can't remember any of the persons he describes in such detail, no stories, no places, no names or characters. No recollection.  There is no focus at all.   How can that be?  It was like nothing as memorable.  I know that this is considered one of the best travel books ever written, but I will have to disagree, strongly.  So I gave up, 10-20 pages from the end.

A few weeks later I needed a book with me when I had to wait for my daughter at the dentists.  I looked in our bookshelf and found "The Old Patagonian Express" by Paul Theroux!  I remember buying this book for my husband, but none of us had read it yet.  I brought it with me, read a few pages at the dentist, and was hooked.  And last night, I finished it.  What a difference.  What joy.  I envy people that haven't read this book, they have such a good read in front of them.

Paul Theroux's book was published a year (1979) after Bruce Chatwin's book and they were friends.  The books are like night and day in difference.  While Bruce Chatwin talks about Patagonia, he never explains how he got there, and his book has not one structured path in it.  Paul Theroux, on the other hand, has a plan, and he loves travel, which for him means to GET TO another place, not BE IN another place.  And I think he is right.  True travel is the transportation phase, the active movement through places, not being dumped in a place and staying there.

The way Paul Theroux traveled to Patagonia is the focus, the structure, of the whole book.  He gets on the subway and then commuter train in Boston in a snowstorm, and then takes local train after local train down to Mexico, through Central America, along the Andes, through long Argentina, and then eventually ends up on The Old Patagonian Express, the narrowgauge steam train that goes to Esquel.  And then the book is over.

This book is not about Patagonia, this book is about human nature, nature and humans. Culture, politics, some natural history, pestering travel companions, good and bad hotel rooms, dusty old railroad cars, giant steaks in dining cars, delays, landslides, revolts, and rats chewing holes in the ceiling above your bed.  It also has great interactions between Paul Theroux and the people he meets, from street urchins in Colombia to impossible Mr Thornberry in Costa Rica and the Argentinians need to be superior while having the right to complain about anything in their own country (and nobody else should).

It is a fantastic story, a meandering travel path through not only North and Latin American geography, but also classic literature (Paul Theroux discusses the books he reads during the trip), and it feels real and human.  He is not trying to be some übermensch, not someone that stands above or besides his co-travelers or people he meets.  He just is.  Now I have to read his other travel books!  Wow, what a read!  Yes, A+ and five stars of course.

There are a lot of great passages in The Old Patagonian Express, and here is one that I think fits this review pretty well:

Reading alters the appearance of a book. Once it has been read, it never looks the same again, and people leave their individual imprint on a book they have read. One of the pleasures of reading is seeing this alteration on the pages, and the way, by reading it, you have made the book yours.

And now, The Old Patagonian Express is mine, forever.  The physical book is still my husband's book, of course. 

Saturday, February 9, 2013

Snö (Snow)

We have all kind of words for snow in Swedish, and even more in the native language Samiska.
Here in my part of Sweden we have had snow on the ground continuously since 29th November 2012. Last night we got a new layer of 10 cm (4 inches) and it is still snowing slowly outside. I read New Jersey have a blizzard, Nemo. How are you faring on the other side of the Pond? (The Atlantic Ocean)


Snö på svenska: blötsnö, kornsnö, kramsnö, snödrev, pudersnö, lovikkavantar (jättesnöflingor!), frost, slask, skare, nysnö, snöflinga, snötäcke, snöfall, snöstorm, snöyra, snömodd, tösnö, snöglopp, klabbsnö, snöboll, snölykta, snögubbe, snögrotta, snödriva, snöhög, snöskred, hängdriva, snöbro...

LS added - here are some translations of the Swedish snow words EH wrote down:
 blötsnö (wet snow), kornsnö (when the snow is like small grains), kramsnö (perfekt snow for snowballs, 'krama' means hug or squeeze), snödrev (drifting snow due to high wind), pudersnö (powder snow, very cold and powder-like), lovikkavantar (jättesnöflingor!) (snowflakes that are as big as mittens), frost (frost), slask (halfmelted snow, slush), skare (hard frozen layer of snow on top of soft snow, that often breaks through when you step on it), nysnö (newly fallen snow), snöflinga (snowflake), snötäcke (snow cover), snöfall (snowing), snöstorm (snow storm), snöyra (blizzard), snömodd (halfmelted snow, mixed with slush), tösnö (melting snow), snöglopp (sleet), klabbsnö (snow that is melting on the surface in the spring and sticks to your skies, not fun), snöboll (snowball), snölykta (snow light, made from snowballs), snögubbe (snow man), snögrotta (snow cave), snödriva (heap of snow, naturally made, snow drift), snöhög (heap of snow, made by humans usually, snöskred (avalanche), hängdriva (hanging snow drift, which can sometimes becom an avalanche), snöbro (snow bridge, often over small creeks of running water, not very safe to ski over)...